 Bluehole Techs
A Web is an interconnected system of public webpages accessible through the Internet. There are tons of billions of electronic information stored on the web. We get access to this information from the web through the application software called a Web Browser.
A web browser is a type of application software that allows you to search/find and view websites and the related information on the Internet. Even if you didn't know what it is, you're using a web browser right now as you’re reading information on this page! There are many different web browsers out there, but some of the most common ones include Google Chrome, Safari, Microsoft Edge, and Mozilla Firefox.
No matter the kind of web browser you use, you will want to learn the basics of browsing the wealth of information on the Web. For this lesson, you have to understand how to use navigation buttons to navigate between the pages visited, tabbed browsing, how to group the tabs, accessing history of the visited pages, creating a bookmark, private browsing, and much more.
Some of the graphics we used as illustrations in this article is a result of image obtained from the Google Chrome web browser. Keep in mind that your browser may look and act a bit differently, but all web browsers work in basically similar way.
URLs and the Address bar
Each information on a website has unique address on the Internet, called a URL (short for Uniform Resource Locator). It's like a street address that tells your browser where to go on the Internet. When you type a URL into the browser's address bar and press Enter on your keyboard or click on the go button, the browser will load the webpage or any object associated with that URL.
Commonly, there are two different places we can used to type a search term from after we open up a web browser: they are called the address bar and the search bar.
The address bar also called locator bar or URL bar is a text box located mostly at the very top of the browser window and can be used to type the URL of information if you know the exact address you want to visit. To use it, type the URL address inside the textbox of the address bar.
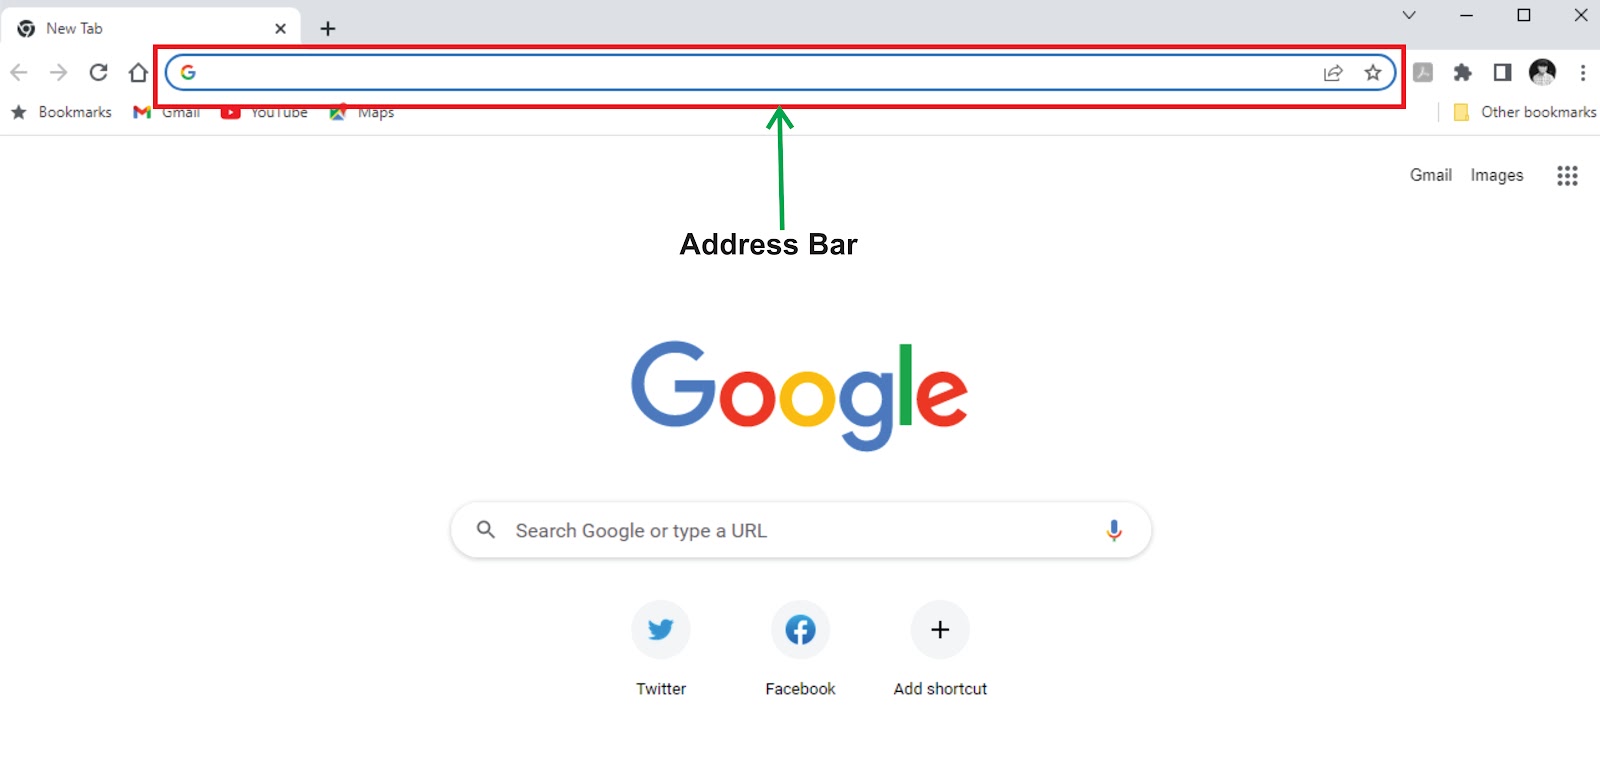
Browser address bar
For a search bar, it has a similar feature and functions with address bar. It is also a textbox used to type a search term(s) to be search from the web. Unlike the address bar that we typed the known URL of an object on the web, the search bar/box is used to search plethora of information concerning term(s) or an event from the web. The search box is used when we either don't know the exact URL address of a site we’re visiting, or if we’re looking for a specific information in the Internet. When you use the search box you will be given a list of websites that the search engine feels best meets the criteria of your search.
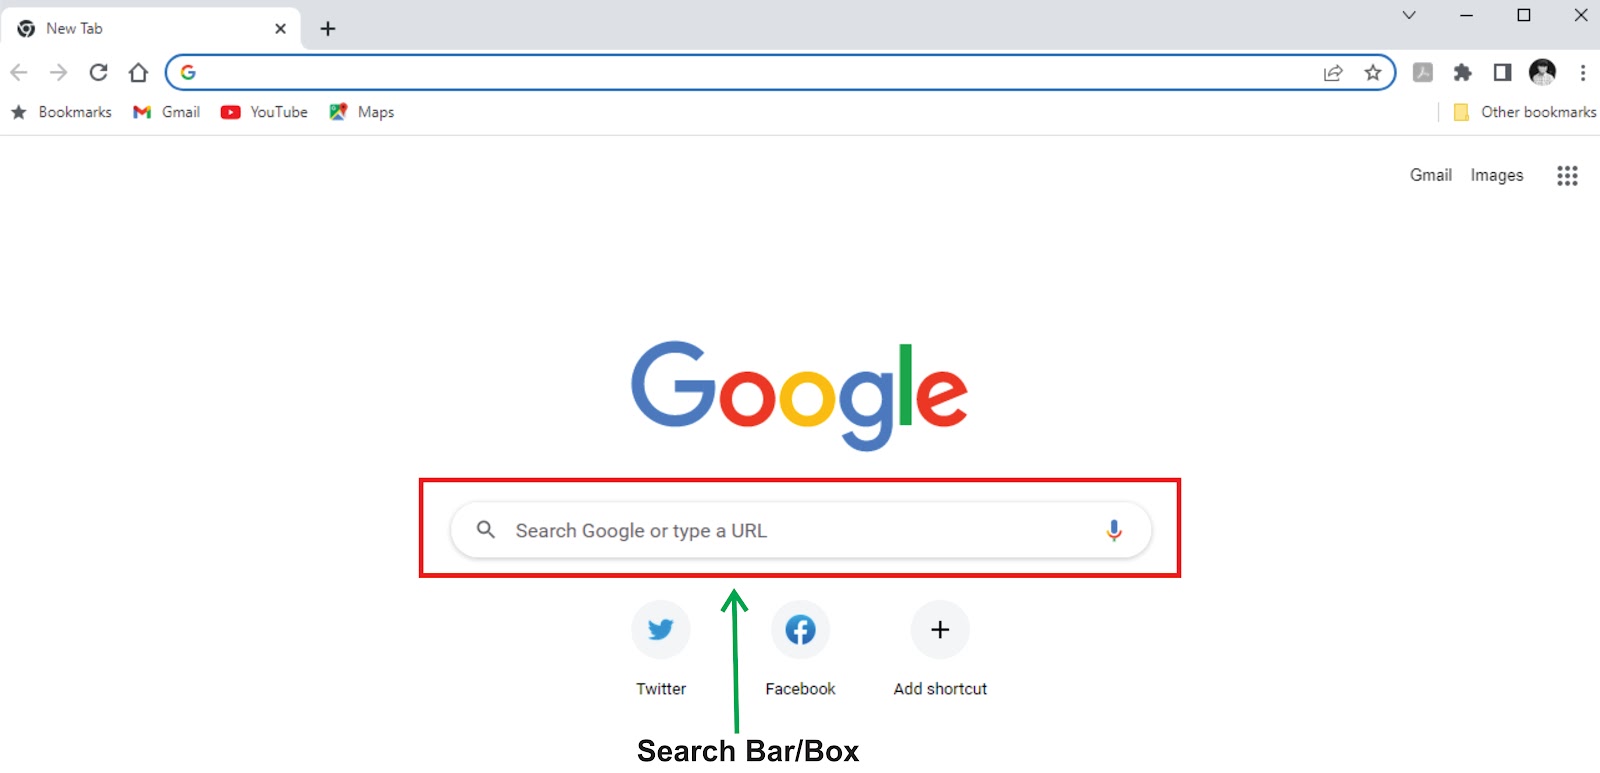
Google Chrome search box
But for now, the recent browser apps had combined the functionalities of search bar into the address bar, which can be used to directly enter the URL address of a known website and still use to enter some search terms.
Navigation bar/buttons
Navigation bar in browser are used to go to the previously visited webpages or to refreshes the page contents. There are basically four buttons available on most browsers that can be use for navigating to the recently visited pages in the browser. These buttons include:
- Back and Forward buttons: The Back and Forward buttons allow you to move to the webpages you have recently viewed. You can also click and hold either button to see the recent history in the browser.

Back and Forward buttons
- Refresh and Cancel button: The Refresh button also called reload button, will reload the current page. If you’re trying to visit a page and it suddenly stop working, try using the Refresh button. While a page is loading, the Refresh button will temporarily change to Stop/Cancel button. You can click this button to stop a webpage from loading.

Refresh and cancel button
- Home button: The Home button if click, will take you directly to the page you setup as home page of your browser. Google Chrome and Firefox browsers set google search page as their default home page, while Microsoft edge browser set Bing search page as a default homepage.

Home button
To navigate to a website:
- Type a web address - also known as a URL into the address bar, then press Enter key on the keyboard.
- The website will be display on the screen.
After visiting multiple websites or webpages, the navigation buttons will change their color from gray to black which indicates that the buttons are active and you can use them to navigate to the previously visited websites.
Tabbed Browsing
Normally, if we want to run two or more works/operations on a particular application software, we should have a multiple window opened for that application. Using a tabbed browsing, we can have a single window open, but having several tabs open inside the window, which is called tab browsing.
Most of the recent browsers allows the opening of links in a new tab. You can open as many links as you want, and they'll all stay in the same browser window instead of cluttering your screen with multiple windows. Browsers that support tabbed browsing allows you to open multiple websites in the same window using tabs. Tabs are usually more convenient than opening multiple windows at a time in your screen.
To Open a New Tab:
- Click the New tab icon (Plus + sign) button to the right of the open tabs, or you can press Ctrl+T on your keyboard.

New tab button
- The new tab will appear. Type the URL of the page you want to visit in the address bar, then press Enter key or click on the Go button to visit the new page.
- The page will be open in that new tab.
To open a link in a new tab:
Tabs can make it easier to browse the web. If you find a link on a website, you can open that link in a new tab. This allows you to open the new page without losing your place on the original page.
- Right-click the link you want to open, then select Open in new tab from the drop-down menu (the exact wording may vary from browser to browser). You can also hover your mouse over the link and press the scroll wheel on your mouse.

Opening link in a new tab
- The page will be open in a new tab.
- Click the tab to view the page.
To Switch Between Tabs:
- Click any tab that is not currently selected.
- The tab will be selected.
You can also press Ctrl+Tab on your keyboard to switch between open tabs.
To cCose a Tab:
- To close a tab, hover your mouse over the tab, then click the Close Tab button (X sign). You can also press Ctrl+W on your keyboard to close the current tab.

Tab closing button
- If you want to close all tabs except for the current one, right-click it and select Close other tabs.
Grouping and Arranging of Tabs
There are two types of people in the world: tab minimalists who have just a few tabs open at a time and a tab collectors who have significantly more tabs open at a time. For minimalists and collectors alike, there is a new way that you can follow to organize your tabs. Under Tab grouping, we’re only going to cover the one available in a google Chrome that can be used to groups and organize the opened tabs, this feature is called tab groups. Even though, the other browsers have similar feature for this, but the names vary from the one in Chrome.
Grouping tabs is a way to group your tabs together to make them easily accessible and visible. With a simple right click, you can group your tabs together and label them with a custom name and color. Once the tabs are grouped together, you can move and reorder them on the tab strip.
Tabs can be group based on your appeal such as by topics. This helps if you're working on several projects, or looking through multiple shopping and review sites. Or you can group your tabs by how urgent they are-- “ASAP,” “this week” and “later.” You can also use an emoji as a group name such as ❤️ for inspiration or 📖 for articles to read. Tab groups are customizable so you can decide how to use them. And just like regular tabs, your groups are saved when you close and reopen Chrome.
Tabs Grouping
- Open Chrome browser.
- Add new Tabs to your already open browser window.
- Choose an option:
- To add a tab to an existing group, drag the tab into the group.
- To add a tab to a new group:
- Click New Tab → right-click a tab → select Add Tab to New Group.
- Enter a name for your newly created group
- (Optional) You can also:
- Select a color for the tab.
- Add additional tabs to the group.
- Remove the group.
Tabs Arrangement
- To change the order of your tabs — Drag a tab along the top of the browser window.
- To pin a tab to the left — Right-click the tab and select Pin. Pinned tabs are smaller and only show the site's icon.
- To unpin a tab — Right-click the tab and select Unpin.
- To move a tab to a different window — Right-click on the tab and point to Move Tab to New Window.
Browsings History
As you browse the Internet for information by visiting different webpages and websites, the browser apps will record all your activities, which includes the details and cookies from the websites you had visited. You can search your history to find a previously viewed page or you can delete the history for the sake of privacy.
To view your browsing history:
- Click the browser app Menu icon, usually located at the top-right corner of the browser window, represented by either horizontal/vertical three dot or by a gear icon.
- The Menu bar commands will appear on the right side of the browser window. Click the History tab. A list of the visited pages will appear with the recently visited at the top.

History sub-menu command
- To view a site that you have already visited at a given time, click the desired site URL. To navigate to a site, just click the link.
Bookmarks
If you find a website or webpage that you want to view later, it can be hard to memorize the exact URL address of the page. Bookmarks, also called favorites in Microsoft Edge browser and some others browsers, are a great way to save and organize specific websites so you can revisit them again and again.
To Add a Bookmark:
- With the desired website open in your browser, click on the Bookmark button located inside URL box by the right side (star sign), then click Add to Bookmark command. You can also press Ctrl+D on your keyboard.

Bookmark button
- A dialog box will appear. To choose a folder for your favorite, click the drop-down menu in the Folder box, and select a folder for to save the page as a bookmark.

Bookmark saving folder
- Click Done to save the website as a Bookmark.
Using Bookmarks:
Once you've added a website to your bookmarks, there are several ways to open the website directly from the Bookmark.
- The address bar: As you begin typing in the address bar, any bookmark matching the text will appear under Bookmarks. Click the bookmark to open it.
- The Bookmarks button: Click the Bookmarks button, then select the folder that you saved your work to, and click on the title link of the site.
- The Bookmarks bar: Some browsers have a separate bookmark button for easily accessing bookmarks. If you have certain sites you use frequently, you can save them to the Bookmarks bar for quick access. To show the Bookmarks bar, right-click the top of the browser window, then select Bookmarks bar. To save the current website to the Bookmarks bar, click the star in the right of the bar.
Managing Bookmarks:
If you're going to use bookmarks regularly, you may want to learn how to organize them so they're easy to access. Grouping bookmarks into folders will make it easier to find the one you need.
To create a folder:
- Click the Bookmarks button, then select the Add to Bookmarks.
- Click on More...
- The Edit Bookmarks dialog box will appear. Select the New Folder button at the bottom-left.
- A new folder will appear. Type a name for the folder, then press Enter.
- The new folder will now appear in the Bookmarks menu.
To move a Bookmark into a folder:
- From the Edit Bookmarks dialog box, click and drag a bookmark into the desired folder.
- The Bookmark will appear in the folder.
To move a folder:
- From the Edit Bookmarks dialog box, click and drag a folder to the desired location. A black line will appear.
- The folder will appear in the new location.
To Add tabs to Bookmarks:
If you're viewing multiple websites on one topic, you can save them all with the Add current tabs to Bookmarks function. The open tabs will be saved as Bookmarks in a new folder, which will allow you to find them easily.
- Right-click the top of the browser window.
- Click Bookmark all tabs..,
- A dialog box will appear. Choose a name and location for the new folder, then click on Save.
- A new folder will appear in the selected location. Select the new folder to access the saved tabs.
To delete Bookmarks and folders:
- Locate the Bookmarks window by either clicking on the Bookmarks sub-menu or from the browser main menu by selecting Bookmark – Bookmark Manager, click on the menu of the bookmark or folder you want to delete, then click the Delete button from the options. You can also press Delete on your keyboard.
- The bookmark or folder will be deleted.
Private Browsing
Private browsing is a privacy feature in web browser apps. When operating in such mode, the browser creates a temporary session that is isolated from the browser's main session and user data. Browsing history is not saved, and local data associated with the session, such as cookies, are cleared when the session is closed, information entered into forms are not saved. These modes are designed primarily to prevent data and history associated with a particular browsing session from being persisting on the device, or being discovered by another user of the same device.
Private browsing modes can be used in hiding undesirable content from the browsing history (such as visits to adult-oriented websites), performing web searches that are not algorithmically influenced by prior browsing habits or the user's recorded interests, providing a clean temporary session for a guest user (such as when using a public computer), and using websites with multiple accounts simultaneously. Private browsing has also been used as a means to circumvent metered paywalls on some websites.
To create a private browsing window, follow the steps below:
- Click on the browser Menu button or Setting Button, depending on the browser you are using.
- Depending on the browser, click on either New Incognito Window, New Private Window or New InPrivate Window.
- A new Private window will open, where you can browse privately. While you are browsing, you will notice the Private icon in the address bar, mostly by the right side of the address bar.
- To stop browsing privately, simply close the Private window.
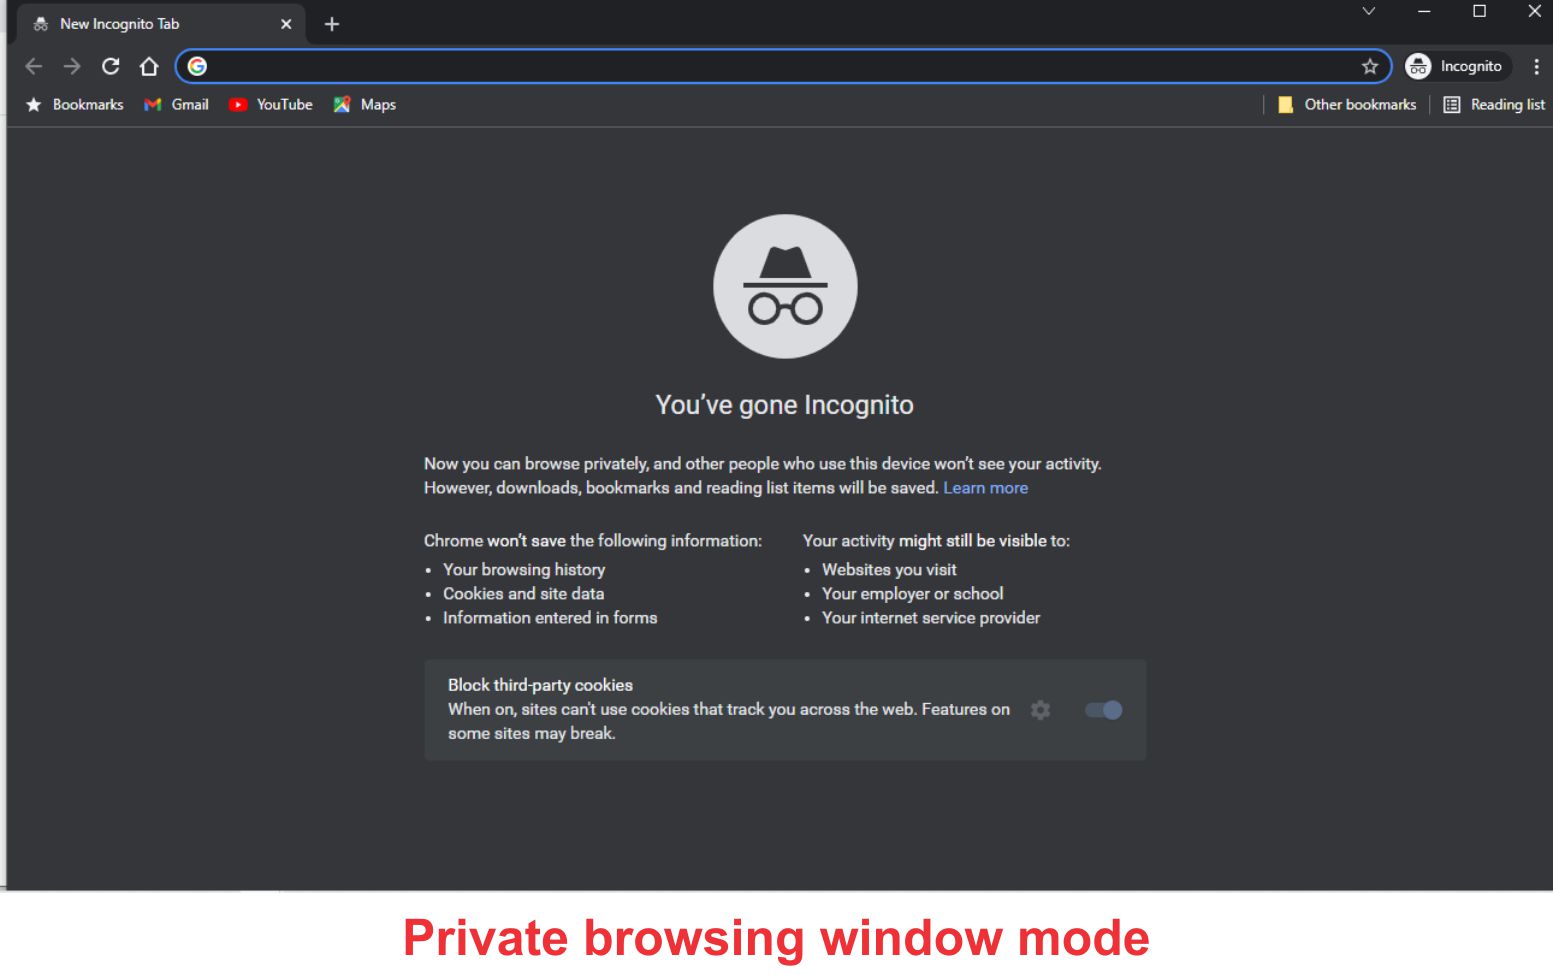
Google Chrome Private browsing mode
Notes:
Private browsing modes do not necessarily protect you from being tracked by other websites or by your Internet service provider (ISP). Furthermore, there is a possibility that identifiable traces of activity could be leaked from private browsing sessions by means of the operating system, security flaws in the browser, or via malicious browser extensions, and it has been found that certain HTML5 APIs can be used to detect the presence of private browsing modes due to differences in behaviour. So with this in our mind, we shouldn’t be confused private browsing feature with a virtual private network (VPN). The latter is just a feature in browser app that doesn’t store your browsing history and cookies data persistently in your device storage location while the former is an online service that will allow you to connect the Internet anonymously.
Browser Plug-ins
Plug-ins also called add-ons, add-in or extensions, are small programs that add features to the browser, and enhance or modify the way web pages are being displayed. Some extensions were designed to let you protect passwords, download videos, find deals, block annoying ads, change how your browser looks, and much more. These small software programs are often developed by a third party.
To find and add extensions in your browser, follow the instructions below:
- For Google Chrome browser:
- Visit the Google extension web address below https://chrome.google.com/webstore/category/extensions
- Search the name of the extension you want to install
- Click on the name of the extension, a new page containing information on the extension will displayed
- Click on the Add to Chrome, and confirm by clicking the Add extension button.
- The extension will be installed and ready to be use by Chrome browser.
- For Firefox browser:
- Visit the Firefox Add-on web address below https://addons.mozilla.org/en-US/firefox/
- Search the name of the add-on you want to install for the Firefox
- Click on the name of the Add-on, a new page containing information on the extension will displayed
- Click on the Add to Firefox, and confirm by clicking the Add button
- The extension will be installed and ready to be use by Firefox browser.
- For Microsoft Edge browser:
- Access the Extensions through the browser App Menu or visit the Edge Add-on web address: https://microsoftedge.microsoft.com/addons/Microsoft-Edge-Extensions-Home
- Search the name of the add-on you want to install for the Edge inside the box
- Click on the name of the extension, a new page containing information on the extension will opened
- Click on the Get button by the top right side of the browser, and confirm by clicking on the Add extension button
- The extension will be installed and ready to be use by the Edge browser.
To Manage Add-ons:
If you don't like an add-on, the Manage Add-ons feature allows you to disable or remove it from browser. You can search the already installed extensions and make the necessary changes to the extension you want to update.
NOTE:
It's important to note that add-ons are not necessarily created or approved by browser. Many are created by third-party providers or even individual users, so they may not always be safe to install. We recommend reading the reviews from the user carefully, before installing any add-on.
To Save and Print a Webpage
In the process of browsing a Web, you might come across a page that grabs your attention. Maybe it’s a step on how to make recipe or a details description of something that caught your attention; or, perhaps you simply want to print out directions from an online Maps on how to get to a destination. Using the printing feature of a browser will go a long way in allowing you to get what you have seen on the browsing screen to be printed on paper or saved as PDF for reading the page later on when you are offline. The steps for printing and saving webpage as PDF is almost similar among the browsers. For this, we would to explore two ways that you can follow to achieve that:
- By using a keyboard shortcut, and
- By accessing the printing feature through the browser menu
Using a Keyboard shortcut to print or save webpage as PDF:
- Have the web page you wish to print open in your browser.
- Press Ctrl+P (for PC) or ⌘ Command+P (for Mac). This will open up the Printing window. A preview of the printed version of the page will be display.
- Because websites are made to be viewed on the screen, the printed version may look different than it does in your browser. Scroll through the preview to see what the print-out will look like, and then continue with the following methods to make any necessary changes.
- Select a printer: If the printer you want to use is not already selected, select it now.
- Page Setup: You can change the settings on how you want the page to looks after it has been print out on paper, such as changing the paging scale, margin, range of pages you want, paper size and page orientation.
- Click Print/Save. This will send the pages to the selected printer. You can also click on Save if you have already selected Save to PDF in the Printer selection option at the top of the preview page, to save the webpage as pdf file.
Using a browser menu to print or save webpage as PDF:
The difference between this method with the first one is only in the second step. Instead of using the keyboard shortcut to access the print feature, we are going to use the browser menu to have access to the print feature. Follow the steps below to see how you can achieve that:
- Have the web page you wish to print open in your browser.
- Click the browser Menu: Most browser application’s Menu is represented by either three small vertical or horizontal lines or dots, or as a small gear icon in the top righthand corner of the browser. Under the Menu, you can locate the sub-menu Print command.
- Click Print: After clicking the Print command, the preview window of the page will be open.
- Select a printer: If the printer you want to use is not already selected, select it now.
- Page Setup: You can change the settings on how you want the page to looks after it has been printed out on paper, such as changing the paging scale, margin, range of pages you want, paper size and page orientation.
- Click Print/Save: This will send the pages to the selected printer. You can also click on Save if you have already selected Save to PDF in the Printer selection option at the top of the preview page, to save the webpage as pdf file.
After you saved the webpage as pdf, you can use any pdf application reader to read it offline either on your personal computer or on your smartphone/Tablet.
Creating QR code for a Webpage or Element of a Page
What is QR Code:
A Quick Response code, abbreviated as QR code are readable, 2-D, matrix barcodes consist of black squares arranged in a square grid on a white background, which can be read by an imaging device such as a camera, and processed using Reed–Solomon error correction until the image can be appropriately interpreted. The required data is then extracted from patterns that are present in both horizontal and vertical components of the image. The data that can be store in QR codes includes:
- Text
- Hyperlink (URL)
- Telephone number
- SMS message
- Contact entry
- Calendar entry
Recently, QR codes have taken on a variety of uses, it can be generated and placed on anything — such as TVs, billboards, tattoos, clothing labels, walls, you name it. Now, most smartphones come with a built-in QR reader, accessible through the camera feature. This makes it easier for people to open any page on the web without manually typing the full address onto a browser.
Some browsers started implementing this feature of generating a QR code for a webpage during a Covid-19 period. Microsoft Edge and Google Chrome are the recently browsers that supported this feature. It can be used to generate QR code for webpage’s URL address link that is currently opened or for some other elements on that particular page, such as picture, video or a sound.
To generate QR code for a webpage, follow the steps below:
- Visit the webpage that you want to generate the QR code for.
- Click inside the address bar of the browser.
- The QR code icon will appear at the right side of the address bar

Icon for QR Code generator in Google Chrome
- Click on the QR code icon
- A small window will appear, you can give the generated QR code a name or leave the default name generated by the browser.
- Click on the Download button. The generated QR code will be saved to your download folder as png file format.
You can also generate a QR code for links to some elements on the currently visited page, such as image. To generate QR code for an image on page as an example, right click on the image and click on the command Create QR Code for this image, then follow the above steps from 5 - 6 to save the QR code.
You can view the details of the already generated QR Code files with the camera reader on the smartphone by scanning the image or use the image app viewer to view the details stored on the QR code file. You can also be able to visit the web address stored in the QR code image directly without the hassle of typing the complete URL by yourself.
Browser apps play a very important roles in todays world of information accessibility. It serves as a window for web users and developers, that creates the connection among them to share any information that was in a digital format.
Some of the recent browser applications can serves a complete features of an operating system, which can allow you to run hundreds of available program apps been hosted on the browser’s main company server. Application programs such as word processor, spreadsheet, presentation, graphics manipulations, etc. are among some of the apps services some browsers incorporated into their browser app. Google Chrome browser is an example of browser that can provides these and more application services into their browser. Hence, a reason why sometimes Google Chrome also called a Chrome OS.
The features of browser listed here are a small number of what are currently available on the recently developed browser applications around the globe. There are several other things that you can use your browser achieve, and also there are hundreds if not thousands of add-ons available out there that could suits your needs.

No comments:
Post a Comment