 Bluehole Techs
Browser Application
Introduction
Everything we used our computing device to do have to do with software. This software is a set of instructions installed on our devices that controls how it should operate. Some of the software fall under what it's called Application or App in short. Each App was designed to handle one type of job on our computing device. The App responsible for retrieving information from the webserver, where all the information of website resides, to be display on the computer screen is called Web Browser.
Also, a Web is an interconnected system of public webpages accessible through the Internet. There are tons of billions of electronic information stored on the web. We get access to this information from the web through the Web Browser App.
A web browser is a type of application software that allows you to search/find and view websites and the related information on the Internet. Even if you didn't know what it is, you're using a web browser right now as you’re reading information on this page! There are many different web browsers out there, but some of the most common ones include Google Chrome, Safari, Microsoft Edge, and Mozilla Firefox.
No matter the type of web browser you used, you should have to learn the basics of browsing the wealth of information on the Web. In this article, you are going to learn how to use the web browser navigation buttons to navigate between the pages visited, tabbed browsing, how to group the tabs, accessing history of the visited pages, and creating a bookmark.
The Address bar and Search Box
The address bar also called locator bar or URL bar is a text box located mostly at the very top of the browser window that can be used to type the address of a file or document on the web. To use it, type the URL address inside the textbox of the address bar and click on the go button or press the Enter key on your keyboard.

Browser Address Bar
A search box, or search bar is also a text box on the browser window used to enter the search query or search terms. Typically, you enter a question and hit a search button. Then you get search results pages based on the query that you typed. Unlike the address bar that we typed the known URL of a document or file, the search box is used when we either don't know the exact URL address of a site we’re visiting, or if we’re looking for a specific information from the Internet. When you use the search box you will be given a list of websites that the search engine feels best meets the criteria of your search.
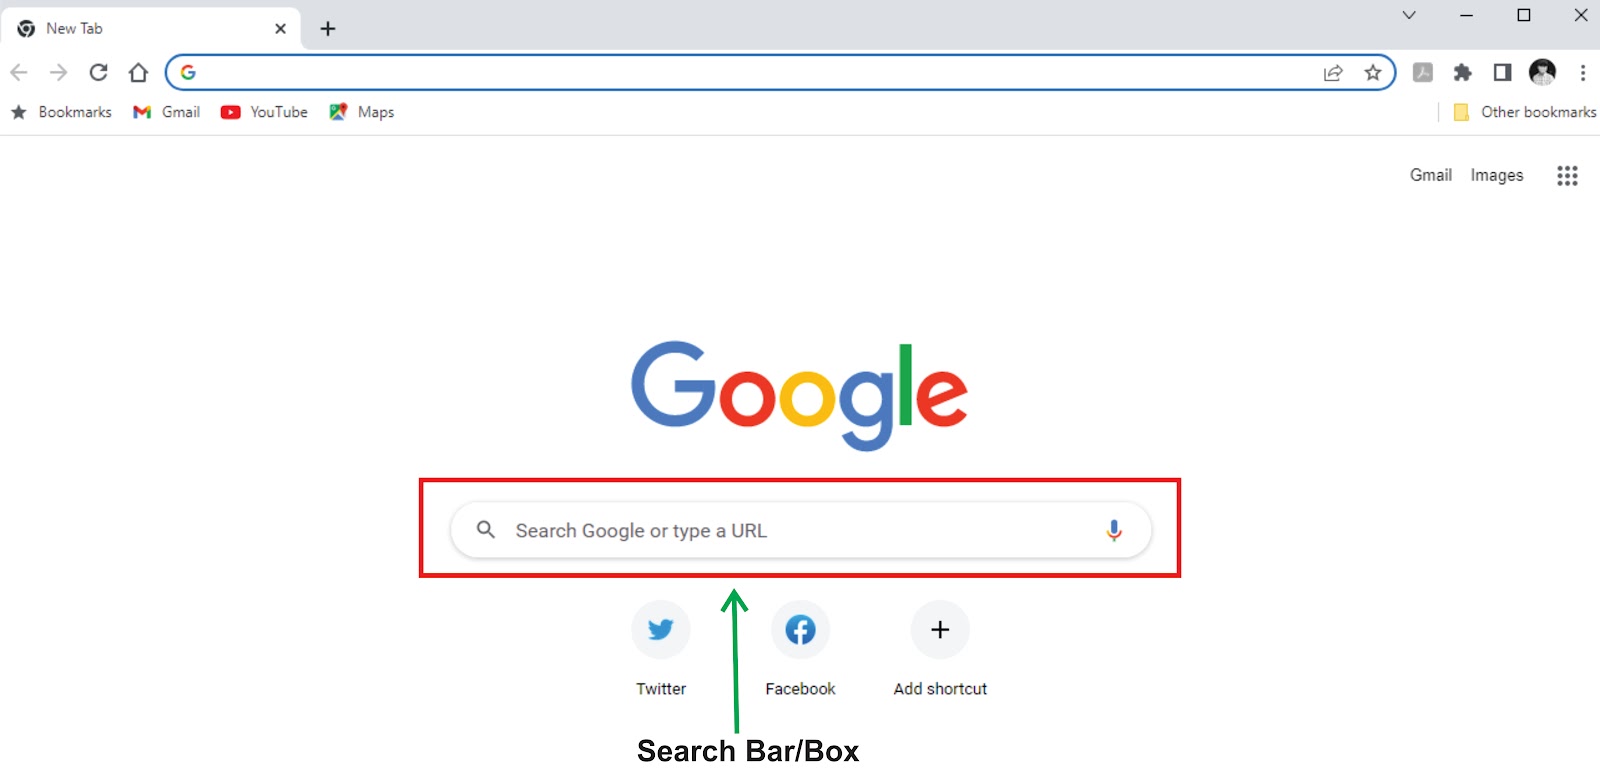
Google Chrome search box
However, the recent browser apps had combined the functionalities of search bar into the address bar, which can be used to directly enter the URL address of a known document or file and still used it to enter your search queries.
Navigation bar/buttons
Navigation bar in browser app are button elements used to go to the previously visited webpages or to refreshes the page window contents.
There are basically four (4)buttons available on most browsers that can be used for navigating to the recently visited pages in the browser window. These buttons include:
- Back and Forward Buttons: The Back and Forward buttons allow you to move to the webpages you have recently visited. You can also click and hold either button to see the recent history of the visited pages in the browser.

Back and Forward buttons
- Refresh and Cancel Button: The Refresh button also called reload, will reload the current page. If you’re trying to visit a page and it suddenly stop working, try using the Refresh button. While a page is loading, the Refresh button will temporarily change to Stop/Cancel button. You can click this button to stop a loading webpage. It’s usually used when a page is taking you longer to load.

Refresh and cancel button
- Home Button: The Home button if click, will take you directly to the page you setup as home page of your browser app. Google Chrome, safari, and Firefox browsers set google search page as their default home page, while Microsoft edge browser set Bing search page as a default homepage.

Home button
To navigate to a website:
- Type the web address - also known as a URL into the address bar, then press Enter.
- The website/page will be display on the screen.
After visiting multiple websites or webpages, the navigation buttons will change their color from gray to black which indicates that the buttons are active, and you can use them to navigate to the previously visited websites.
Tabbed Browsing
Normally, if we want to run two or more works/operations on a particular application software, we will have multiple windows opened for that same application. Using a tabbed browsing in the browser app, we can have a single window open, but having several tabs open inside the window, which is called tab browsing.
Most of the recent browsers allows the opening of links in a new tab. You can open as many links as you want, and they'll all stay in the same browser window instead of cluttering your screen with multiple windows. Browsers that support tabbed browsing allows you to open multiple websites in the same window using tabs. Tabs are usually more convenient than opening multiple windows at a time in your screen.
To open a new tab:
- Click the New tab icon (Plus + sign) button to the right of the open tabs, or you can press Ctrl+T on your keyboard.

New Tab button
- The new tab will appear. Type the URL of the page you want to visit in the address bar, then press Enter key or click on the go button to visit the new page.
- The page will be open in the new tab.
To open a link in a new tab:
Tabs can make it easier to browse the web. If you find a link on a website, you can open that link in a new tab. This allows you to open the new page without losing your place on the original page.
- Right-click the link you want to open, then select Open in new tab from the drop-down menu (the exact wording may vary from browser to browser). You can also hover your mouse over the link and press the scroll wheel on your mouse.

Opening link in a new tab
- The page will be opened in a new tab.
- Click the tab to view the page.
To switch between tabs:
- Click any tab that is not currently selected.
- The tab will be selected.
You can also press Ctrl+Tab on your keyboard to switch between open tabs.
To close a tab:
- To close a tab, hover your mouse over the tab, then click the Close Tab button (X sign). You can also press Ctrl+W on your keyboard to close the current tab.

Tab closing button
- If you want to close all tabs except for the current one, right-click it and select Close other tabs.
Tabs Grouping and Arrangement
There are two types of people in the world: tab minimalists who have just a few tabs open at a time and a tab collectors who have significantly more tabs open at a time. For minimalists and collectors alike, there is a new way that you can follow to organize your tabs.
Grouping tabs is a way to group your tabs together to make them easily accessible and visible. With a simple right click, you can group your tabs together and label them with a custom name and colour. Once the tabs are grouped together, you can move and reorder them on the tab strip.
Tabs can be group based on your appeal such as by topics. This helps if you're working on several projects or looking through multiple shopping and review sites. Or you can group your tabs by how urgent they are-- “ASAP,” “this week” and “later.” You can also use an emoji as a group name such as ❤️ for inspiration or 📖 for articles to read. Tab groups are customizable so you can decide how to use them. And just like regular tabs, your tab groups are saved when you close and reopen Chrome.
For this article, we’re only going to talk on the Tab grouping feature available in google Chrome that can be used to groups and organize the opened tabs, this feature/command is called tab groups. Even though, the other browsers have similar feature for this, but the names vary from the one in Chrome.
Tabs Grouping
- Open Chrome browser.
- Add new Tabs to your already open browser window
- Choosing an option:
- To add a tab to an existing group, drag the tab into the group.
- To add a tab to a new group:
- Click New Tab → right-click a tab → select Add Tab to New Group.
- Enter a name for your group.
- (Optional) You can also:
- Select a color for the tab.
- Add additional tabs to the group.
- Remove the group.
Tabs Arrangement
- To change the order of your tabs — Drag a tab along the top of the browser window.
- To pin a tab to the left — Right-click the tab and select Pin. Pinned tabs are smaller and only show the site's icon.
- To unpin a tab — Right-click the tab and select Unpin.
- To move a tab to a different browser window — Right-click on the tab and point to Move Tab to New Window.
Browser History Session
As you browse the Internet for information by visiting different webpages and websites, the browser apps will record all your activities, which includes the details and cookies from the websites you had visited. You can search your history to find a previously viewed pages or you can delete the history for the sake of privacy.
To view your browsing history:
- Click the browser app Menu icon, usually located at the top-right corner of the browser window, represented by either horizontal/vertical three dot or by a gear icon.
- The Menu bar commands will appear on the right side of the browser window. Click the History tab. A list of the visited pages will appear with the recently visited at the top.

History Menu command
- To view a site that you have already visited at a given time, click the desired site URL. To navigate to a site, just click the link.
Bookmarks
If you find a website or webpage that you want to view later, it can be hard to memorize the exact URL address of the page. Bookmarks, also known as favorites in Microsoft Edge browser and some other browsers, are a feature available in browser app that gives you a great way to save and organize specific websites so you can revisit them again and again.
To add a Bookmark:
- With the desired website open in your browser, click on the Bookmark button located inside url box by the right side (star sign), then click Add to Bookmark command. You can also press Ctrl+D on your keyboard to access the Bookmark feature.

Bookmark button
- A dialog box will appear. To choose a folder for your favorite, click the drop-down menu in the Folder box, and select a folder for to save the page as a bookmark.

Bookmark saving folder
- Click Done to save the website as a Bookmark.
Using Bookmarks:
Once you've added a website to your bookmarks, there are several ways to open the website directly from the Bookmark.
- The Address bar: As you begin typing in the address bar, any bookmark matching the text will appear under Bookmarks. Click the bookmark to open it.
- The Bookmarks button: Click the Bookmarks button, then select the folder that you saved your work to, and click on the title link of the site.
- The Bookmarks bar: Some browsers have a separate bookmark button for easily accessing bookmarks. If you have certain sites you use frequently, you can save them to the Bookmarks bar for quick access. To show the Bookmarks bar, right-click the top of the browser window, then select Bookmarks bar. To save the current website to the Bookmarks bar, click the star in the right of the bar.
Managing Bookmarks:
If you're going to be using bookmarks frequently, you may want to learn how to organize them so they're easy to access. Grouping bookmarks into folders will make it easier to find the one you need.
To create a folder:
- Click the Bookmarks button, then select the Add to Bookmarks.
- Click on More...
- The Edit Bookmarks dialog box will appear. Select the New Folder button at the bottom-left.
- A new folder will appear. Type a name for the folder, then press Enter.
- The new folder will now appear in theBookmarks menu.
To move a Bookmark into a folder:
- From the Edit Bookmarks dialog box, click and drag a bookmark into the desired folder.
- The Bookmark will appear in the folder.
To move a folder:
- From the Edit Bookmarks dialog box, click and drag a folder to the desired location. A black line will appear.
- The folder will appear in the new location.
To Add Tabs to Bookmarks:
,p>If you're viewing multiple websites on one topic, you can save them all with the Add current tabs to Bookmarks command. The open tabs will be saved as Bookmarks in a new folder, which will allow you to find them easily.- Right-click the top of the browser window.
- Click Bookmark all tabs..,
- A dialog box will appear. Choose a name and location for the new folder, then click Save.
- A new folder will appear in the selected location. Select the new folder to access the saved tabs.
To delete Bookmarks and folders:
- Locate the Bookmarks window by either clicking on the Bookmarks sub-menu or from the browser main menu by selecting Bookmark – Bookmark Manager, click on the menu of the bookmark or folder you want to delete, then click the Delete button from the options. You can also press Delete on your keyboard.
- The bookmark or folder will be deleted.
NOTE:
The graphics we used for the illustrations are from Chrome browser. Keep it in your mind that your browser may look and act a bit differently, but all web browsers work in basically similar way.
Don't forget to share the article on your social media handles by clicking the Share button so that others can also benefit!

No comments:
Post a Comment